How to start your Own website and Start making money
How To make a WordPress Website
WordPress is free to install, deploy, and upgrade. Thousands of plugins and templates power a flexible and simple interface, which reduces development costs and deployment time.Around 30% of all websites on the Internet use WordPress. That number is astounding if you think about it. More than one in every four websites that you encounter are using WordPress.

In this lesson you can learn about how to create your first website on WordPress.
Here is an overview from start to finish of all the steps we’ll walk you through in this guide.
- How to find and register a domain name for free
- Choosing the best web hosting
- How to install WordPress
- Installing a template to change your site’s design
- Creating pages in WordPress
- Customizing WordPress with addons and extensions
- Resources to learn WordPress and get support
- Taking it further, building websites with more features
What do I need to build a website?
- A domain name – this is the name of your website such as google.com
- WordPress hosting – this is where your website files are stored.
- 45 minutes of your undivided attention.
A typical business website can cost as low as $100 per year and can go as high as $30,000 per year.
We recommend all our users to start small and then add more features to your website as your business grows. This way you will save money and minimize potential losses and avoiding overspending.
In this guide, we’ll show you how to build a website for less than $100.
We will also show you how to take it further by adding more features to it in the future.
1. Set Up Your Hosting Account:
Creating a hosting account on HostGator is extremely easy. Just follow these simple steps.
At first, go to HostGator.com and click on ‘Get Started Now!‘ button.

On the next page, you need to select a plan. HostGator offers 3 plans on its shared hosting – Hatchling, Baby, and Business plan. The basic difference between Hatchling and Baby plan is, Baby plan allows you to host unlimited domain where you can host only one site on Hatchling plan. Business Plan is designed for business and service-oriented site.
If I were you I would select Baby plan.
Once you’ve chosen a plan, click on ‘Sign Up Now!‘ button.

Then you’ll be landed to the HostGator Order Form page.
Now you need to choose a domain name. If you don’t have any domain name, click on ‘Register a New Domain’ tab and enter your desired domain name. If you already own a domain, click on ‘I Already Own This Domain’ tab and enter your domain.
For the sake of this tutorial, I assume that you’re going to register a new domain name with HostGator. Once you’ve entered your domain name, it will show whether the domain is available or not. It will also show the available domains for different extensions.
HostGator offers ‘Domain Privacy Protection’ service which costs $9.95/year. Privacy Protection hides your personal contact information for public view. If it’s not a problem for you, just uncheck the box “Add Domain Privacy Protection” and save $9.95.


Then enter your Email, Name, Address, Phone number & other details. Make sure that you’ve put your correct phone number as they might call you for verification.
Select a payment method from the right side. You have two options – Credit Card or Paypal.i have paypal so i will select paypal.

HostGator offers some additional services with some extra cost. You don’t need those services to create your WordPress blog. Uncheck all the Additional Services to save your money.

In the coupon code field, you’ll find a default coupon ‘SNAPPY’ or something look like that can give you 20% discount. I’d suggest you to use the coupon MONISHA360 to get 70% discount on your total purchase. However, if you are going to pay only for one month, use the coupon MONISHA360 to get your first month hosting only for $0.01! Make sure that you’ve selected ‘1 month’ in Billing Cycle.

Then review your order details and click on ‘Checkout Now‘ button.
Complete your payment and they will send you a confirmation email with your cPanel login details.
2. Install WordPress on HostGator cPanel
There are 3 ways to install WordPress on HostGator cPanel – QuickInstall, Fantastico De Luxe, and Manual. In this post, I will show you QuickInstall method.Using QuickInstall is the easiest way to create a WordPress Blog. It will require only 5 minutes to start a blog. Even if you are a noob you can do it easily. Just follow these simple steps.
1. At first, login to your cPanel. Most of the time, it is http://yourdomain.com/cpanel. If this doesn’t work for you, go to email address and find out the Email sent by HostGator after you signed up. You will find your cPanel link, Username and Password there.
Once you’ve logged in to cPanel, Scroll down and click on QuickInstall under ‘Software/Services’.


Probably You will get the latest WordPress version to install. Just click on the “Install WordPress” button.

3. Now fill the form properly to get started with your install. Check the following instructions.
- Select the domain name where you want to install WordPress. If it is your first blog then you will have only one option.
- Admin Email: Put your Email there. If you forget your Username or Password, you can get it via this Email.
- Blog Title: The name of your blog. You can change it later.
- Admin User: It will be the Username of your WordPress Dashboard. Don’t use “admin” as username.
- First Name: It will be added to Admin Profile. You can change it anytime after install.
- Last Name: This is also the part of Admin Profile name. You can change it later.

4. Once WordPress is installed, it will show “Your install is complete. Click Here to view your notifications” on header.

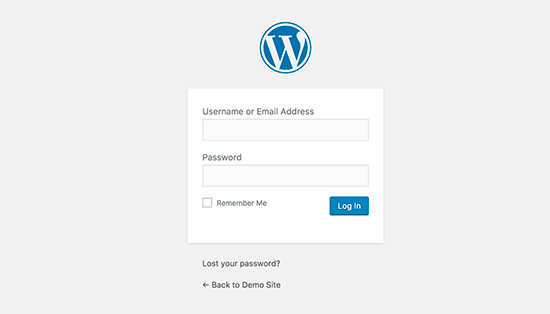
Go to Admin URL (http://yourdomain.com/wp-admin), put your username and Password and click on ‘Log in’.
Step 3: Select Your Theme:
The visual appearance of your WordPress site is controlled by a WordPress theme.
WordPress themes are professionally designed templates that you can install on your website to change its appearance.
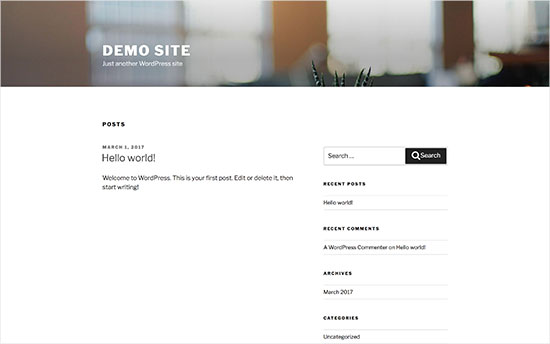
By default, each WordPress site comes with a basic theme. If you visit your website, then it will look something like this:
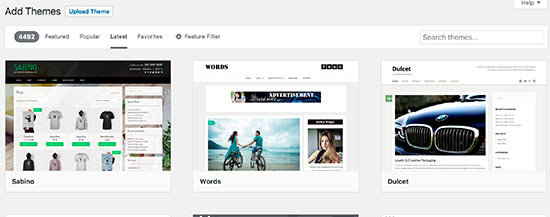
You can change your theme from the WordPress admin dashboard. Visit Appearance » Themes page and then click on the ‘Add New’ button.

On the next screen, you will able to search from 4,492 free WordPress themes that are available in the official WordPress.org themes directory. You can sort them by popular, latest, featured, as well as other feature filters (i.e industry, layout, etc).
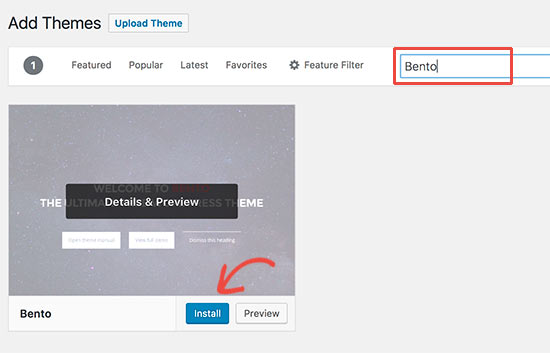
For the sake of this guide, we’ll be using Bento. It is a popular multi-purpose free WordPress theme with flexible design options for all kind of websites.
If you know the name of the free theme you want to install, then you can look for it by entering its name in the search field.
WordPress will show you the theme in search results. You will need to take your mouse over to the theme and then click on the Install button.
Once you have installed your theme, you can customize it by clicking on the Customize link under the Appearance menu.
This will launch the theme customizer where you will be able to change your theme settings with live preview of your website.
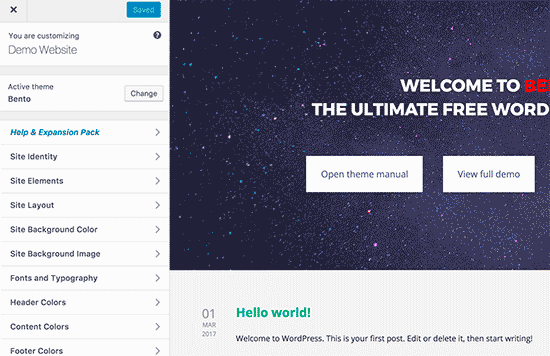
You don’t need to finalize all theme settings right away. You will be able to customize it much better once you have some content on your website.
Let’s see how to add content to your WordPress site.
Step 4. Add Content to Your Site(Publish Your First Article)
By default, WordPress shows your blog posts on the front page of your website. You can change that, and make WordPress show any page as the front-page of your website (we’ll show you how to do that later in this guide).
You can create a separate page for your blog or news section. In fact, you can create a website without any blog section at all.
Having said that, let’s add some content to your website.
You’ll start by adding a few pages to your WordPress site. Don’t worry if you don’t have enough content for these pages at the moment. You can always edit and update them.
Head over to Pages » Add New page in WordPress admin area. This will bring you to the page editor screen, which looks like this:
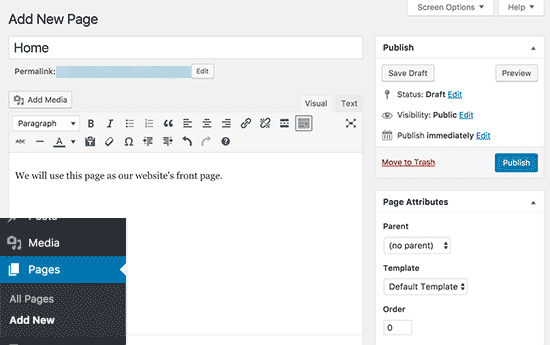
First you need to provide a title for your page, let’s call this page ‘Home’.
After that you can add content in the text editor below. You can add text, links, images, embed videos, audio, etc.
After adding content to your page, you can click on the publish button to make it live on your website.
You can repeat the process by adding more pages for different sections of your website. For example, an about page, contact us, and a blog page to display blog posts.
Now let’s add a few blog posts as well.
Head over to Posts » Add New in your WordPress admin area.
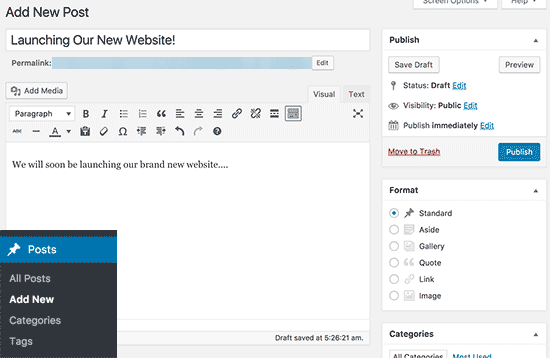
You can add a post title and then add content in the visual post editor. You’ll also notice some extra options like post formats, categories and tags.
You can click on the save button to store your post as a draft or click on the publish button to make it visible on your site.
Step 5. Customizing and Tweaking Your Website
Now that you have created some content on your website, you will be able to customize and put it all in a nice presentable shape on your website.
Let’s start by setting up a static front Page.
Setting up a Static Front Page
You need to visit the Settings » Reading page in your WordPress admin area. Under the ‘Front page displays’ option click on the static front page and then select ‘Pages’ you created earlier for your home and blog pages.
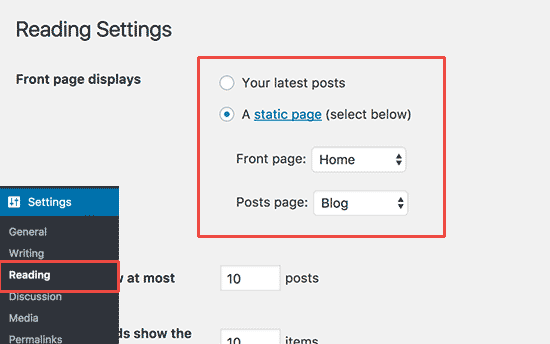
Don’t forget to click on the ‘Save Changes’ button at the bottom of the page to store your changes.
WordPress will now use the page titled ‘Home’ as your site’s front page and ‘Blog’ page to display your blog posts.
Change Site Title and Tagline
During the installation you get to choose your site’s title. WordPress automatically adds a tag line to your site title that says ‘Just another WordPress site’.
You can change both your site’s title and tagline at any time by visiting Settings » General page.

Your site title will be the name of your website like WPBeginner. The tag line is usually a single line that describes your website. You can also leave the tag line field blank if you want.
Don’t forget to click on the save changes button to store your settings.
Set up Comments Settings
WordPress comes with a built-in comment system allowing your users to leave comments on your posts. This is great for user engagement, but it is targeted by spammers as well.
To deal with this, you’ll need to enable comment moderation on your website.
Visit Settings » Discussions page and scroll down to ‘Before a comment appears’ section. Check the box next to ‘Comment must be manually approved’ option.
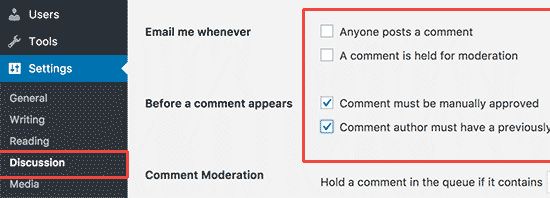
Don’t forget to click on the save changes button to store your settings.
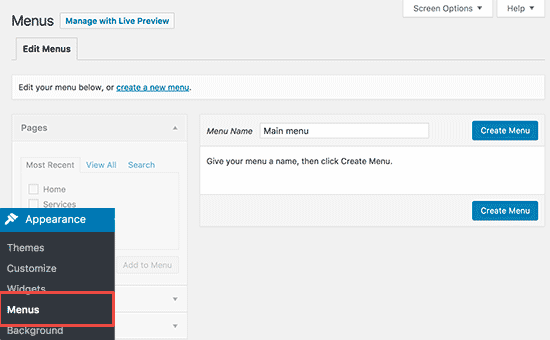
Create Navigation Menus
Navigation menus allow your users to browse different pages or sections on your website. WordPress comes with a powerful navigation menu system, and your WordPress theme utilizes this system to display menus.
Let’s add a navigation menu to your website.
First, you need to visit Appearance » Menus page. Enter a name for your navigation menu and click on the create menu button.
WordPress will now create your navigation menu. But it will be empty at the moment.
Next, you need to select the pages you want to display in your menu and then click on add to menu button.
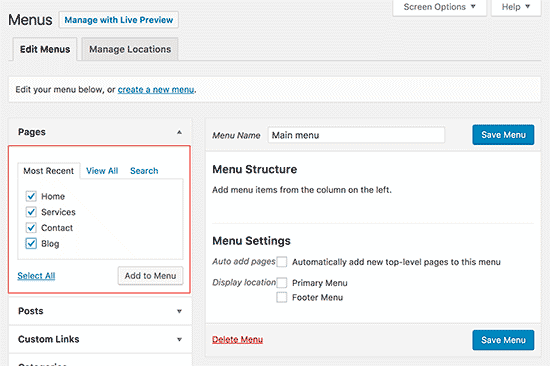
You will notice your selected pages filling the empty area of your navigation menu. You can move them up and down to rearrange their position in the menu.
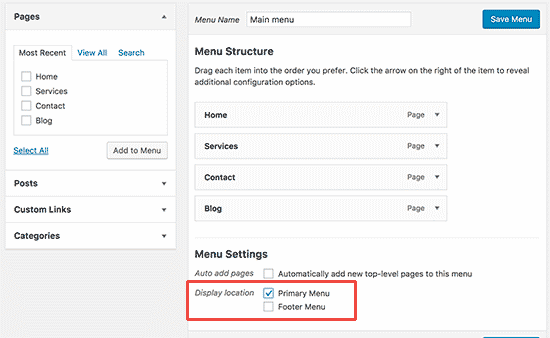
Now you need to select a display location. These locations are defined by your WordPress theme. Usually, most WordPress themes have a primary menu that appears on top.
Finally, click on the save menu button to store your navigation menu.
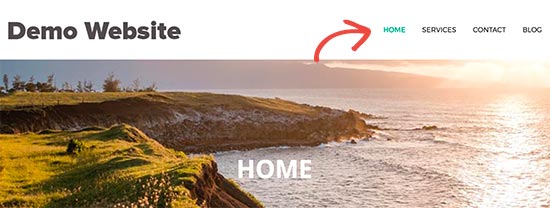
You can now visit your website to see the menu in action.
Step 6. Installing Plugins
WordPress Plugins are like apps for your WordPress site. They allow you to add features to your WordPress site. Think contact form, photo galleries, etc.
There are currently more than 49,000 free plugins available for WordPress. There are also paid plugins sold by third-party websites and developers.
Here is our list of essential plugins that you should install on your site right away. All of them are free.
Features
- WPForms Lite – Allows you to add a contact form to your WordPress site.
- Envira Gallery Lite – Add beautiful image galleries to your WordPress site
- MonsterInsights – Connect your website with Google Analytics and see how visitors find and use your website, so you can keep them coming back.
Website Optimization
- Yoast SEO – Improve your WordPress SEO and get more traffic from Google
- WP Super Cache – Improves your website speed by serving cached pages
Security
- Updraft Plus – Create automatic scheduled backups of your website
- Sucuri – Website security audit and malware scanner
Step 7: Learn WordPress Development(Resources to Learn WordPress)
WordPress is easy to use yet extremely powerful. From time to time, you may find yourself looking for some quick answers
How to start your Own website and Start making money
 Reviewed by Puja Roy
on
November 22, 2018
Rating:
Reviewed by Puja Roy
on
November 22, 2018
Rating:
Reviewed by Puja Roy
on
November 22, 2018
Rating:


No comments: